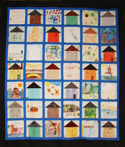
Creating picture blocks for quilts

Preparation for most methods
- Decide on a block size. I have found that ten and a half to twelve and a half inch blocks are a good size for kids to work on.
- Cut out a square for each student. I recommend 100% cotton fabric in white or off white if an antique look is desired.
- Cut a square of plastic coated freezer paper (found in most grocery stores with the baggies) the same size as the fabric and iron on to the back of each square. This will stabilize the fabric so it is much easier to draw on.
- I usually encourage students to make a rough draft of their drawing on a sheet of paper and to draw their design in pencil on the fabric before beginning.
I use a rotary cutter for all the above and an old blade for cutting the freezer paper.
Using fabric crayons
My favorite technique for making picture blocks with students is to use Pentel Fabric Crayons on 100% cotton fabric. Kids can draw directly on the fabric so what they see is what they get. These are soft like oil pastels and blend beautifully. Encourage kids to use bold strokes. The blocks will need to be heat set following the directions that come with the crayons. The best place to find the crayons are arts and crafts stores.
Using Rubber Stamps
This is an interesting alternative which I have used on quilts at home but not with kids-- yet. There are some commercial inks especially for stamping on fabric but I like to use regular fabric paint on a finely textured sponge (a make-up sponge or the sponge that is used for packing works great). Instead of pressing the stamp into the sponge, dab the paint on the stamp with the sponge. You have a lot more control. Students might want to practice stamping on paper first.
Heat-n-Bond Applique
Iron heavy Heat-n-Bond that does not require further finishing of the edges onto the back of lots of different fabrics. Let kids cut out shapes and arrange them collage style onto the fabric. Have an adult iron them down. Students can add further embellishments with fabric markers or permanent pen.
Other Methods
Regular crayons can be used on fabric and heat set, though the colors are not as bright as the Pentel crayons. Fabric markers and fabric paint that can be found at discount and craft stores work well for making picture blocks. Be sure to follow the manufacturer's directions for colorfastness. Older students may want to learn how to do traditional applique.
There are also iron on methods that can be used with printers and photocopiers. There is an iron on transfer paper made by Canon that can be found in most office suppy stores. Students could use a drawing or paint program on the computer to create their pictures and then the pictures could be printed on the transfer paper with a color Canon printer. The transfer paper adds just a bit of stiffness to the fabric. Some professional printing shops carry an iron on paper that can be used with a color photocopier which might be used to copy a child's existing art. Both kinds of paper are somewhat expensive-- usually $1-2 a sheet.
Another new product is called Bubble Jet Set which is used with your ink jet printer. Fabric is soaked in this product and then hung to dry. It is then ironed to freezer paper and the image is printed on the fabric and becomes permenant if left to sit for 24 hours.
© Copyright 1996-2012 Heddi Craft