Putting the Top Together
Although you could have students hand sew your quilt blocks, I think this task is unnecessarily time consuming for children and difficult to organize so that students share the work equally. Instead, I recommend machine sewing the blocks together and adding borders at home. I also feel that machine sewing the blocks together adds some stability to the hand pieced work the students do.
What To Do With the Students
I encourage you to involve students in designing the final layout of the quilt. Sometimes I give students several layout choices that I have predetermined and allow them to choose one. Other times I let a small group of students arrange the blocks on the floor in a pattern they find interesting and then have the whole class critique and modify the results. The Tolliver's Secret quilt was laid out so that the blocks told the story of the book in order. The Fifty States Quilt was organized in the order that the states entered the Union. Working as a class to lay out the blocks will allow you a chance to talk about balance and how to organize graphics to that the eye is moved around the quilt.
I also allow the students some choices whenever possible about the color of the sashing and of any borders we are adding to the quilt. Sometimes the fabric is donated and we have few choices. One year I invited students to go fabric shopping with me to pick the border fabrics.
When the quilt blocks are arranged in the order we want them, I pin the blocks into stacks that represent the rows. For instance, in a quilt that is four blocks across and five blocks long, I take the uppermost left hand block and place it on the block right below it. Then I lift up those two blocks and place them directly on the block right below that and so on, until I have a stack of five blocks. I pin those five together with a scrap of paper marked "Column 1". I repeat this procedure for each of the remaining three columns. Now I can carry them home to sew without getting them out of order.
At Home
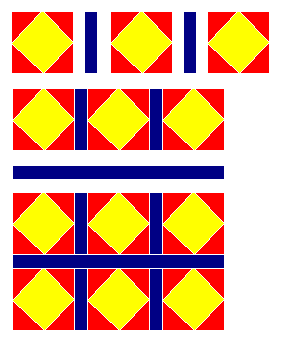
If you are not adding sashing (strips of plain fabric between each of the blocks), then putting the blocks together is easy.
- Set the stacks marked "Column 1" and "Column 2" next to each other, being careful not to rotate either one or get the blocks out of order.
- Take the first block from column 1 and put the first block from column 2 face down on top of it (right sides together) so that the edges line up. Sew the two blocks together on the right hand side with a quarter inch seam allowance. Do not cut the thread!
- Leave the blocks under the foot of your sewing machine, while you align the second blocks from each stack in the same way you did the first two. Sew together. Now you will have two sets of blocks joined by a short pair of threads.
- Continue in this manner until all the blocks from columns 1 and 2 are sewn together. You will have a long, connected set of blocks. Do not cut them apart!
- Get out the stack marked "Column 3." Take the first block from column 3 and align it with the first block from column 2 (which is already attached to the first block from column 1 on the left hand side) and sew, again not cutting the thread at the end.
- Continue sewing the column 3 blocks to the column 2 blocks in this manner. You will now have rows going across of three blocks that are connected to the row below it going across by short threads.
- Continue with each of you stacked rows until you have attached all your stacks together.
- Now, since you haven't cut the threads, the long rows going across are connected to each other in order! Fold each row right sides together with it's neighbor. You may want to pin at the seam line on either side of each block to line up the entire row. Sew these long rows together until they are all connected.
- Press the completed quilt top!
It is likely that not all of the blocks will be exactly the same size. When necessary ease the blocks together by stretching the shorter one slightly to meet the top and bottom edges of the longer block. If the blocks are different sizes by more than 1/4 inch, align the blocks as best you can and cut off the excess evenly on the top and bottom edge of the block either with a pair of scissors or rotary cutter or by ignoring it when sewing and making the seam allowance wider in that area. If the pieces have been cut accurately and the seam allowances have been marked, this seldom happens.
If you wish to add sashing between the blocks (see our Fifty States Quilt), you will need to add some extra steps to the above proceedure. You will need to cut strips of fabric as long as the quilt blocks and as wide as you wish the sashing to be. I think two and a half inch wide strips are a good size for sashing, though you can experiment by looking at the blocks set different distances apart to give you an idea of how wide you want to make your sashing. In step 2 above, attach a piece of sashing instead of the column 2 blocks. Then add the column two block to the other side of the sashing. Repeat between each stack of blocks.
To sew the rows together, measure the average length of the rows with the sashing between the blocks. (I frequently iron the rows before this step, turning the seam allowances toward the sashing.) Cut long strips of the sashing fabric as long as the rows and as wide as you have decided. Cut the short strings that separate each row from it's neighbor and sew the sashing first to one row, then to the other. As suggested above, it's a good idea to pin the long strip to the row before sewing.
After all of the rows are sewn together in this manner, measure horizontally edge to edge through the center of the quilt. (I usually iron the quilt before this step as well.) Cut two sashing strips this length and sew them to the top and bottom edge of the quilt. Now measure vertically edge to edge through the center of the quilt. Cut two more sashing strips this length and sew them to the left and right edges of the quilt. Again, it is helpful to pin the strips in place before sewing. Press these seam allowances toward the sashing strips as well.
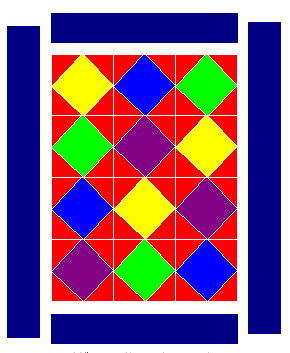
To add borders, decide how wide you wish the borders to be. You may use a single border (four to six inches wide usually looks balanced) or you may add multiple borders of different widths. Experiment with different widths of fabric next to your quilt top or draw the quilt to scale and experiment on graph paper. Follow these steps for each border:
- Iron the quilt top so that it lies flat.
- Measure horizontally edge to edge through the center of the quilt. Cut two border strips this length and the width you have decided.
- Pin the border strips to the quilt and sew them to the top and bottom edge of the quilt. You may have to sew two or more strips together to get the length you need.
- Now measure vertically edge to edge through the center of the quilt.
- Cut two more border strips this length and sew them to the left and right edges of the quilt. Again, it is helpful to pin the strips in place before sewing.
- Press these seam allowances toward the border fabric.
© Copyright 1996-2012 Heddi Craft